
1.下载Linux服务端到服务器
yum -y install wget
wget http://down.sstp.top/Nps/0.26.10/linux_amd64_server.tar.gz
2.创建nps使用的文件夹
mkdir nps3.把软件移动到创建好的nps文件夹中
mv linux_amd64_server.tar.gz ./nps4.进入创建的nps文件夹解压压缩包
cd nps
tar -zxvf linux_amd64_server.tar.gz
5.安装启动nps服务
./nps install
nps start
如果是windows系统,管理员身份运行cmd,安装时输入nps.exe install,启动需要进入程序目录输入nps.exe start。
安装后windows配置文件位于C:\Program Files\nps,linux位于/etc/nps
浏览器打开IP+8080端口,即可看到nps管理界面,用户名和密码默认是admin/123,请及时修改。

修改配置文件
如果需要修改登录用户名、密码、网页登录端口等信息,可以修改/etc/nps下的nps.conf文件,相关的参数信息可以看表格。
| 名称 | 含义 |
|---|---|
| web_port | web管理端口 |
| web_password | web界面管理密码 |
| web_username | web界面管理账号 |
| web_base_url | web管理主路径,用于将web管理置于代理子路径后面 |
| bridge_port | 服务端客户端通信端口 |
| https_proxy_port | 域名代理https代理监听端口 |
| http_proxy_port | 域名代理http代理监听端口 |
| auth_key | web api密钥 |
| bridge_type | 客户端与服务端连接方式kcp或tcp |
| public_vkey | 客户端以配置文件模式启动时的密钥,设置为空表示关闭客户端配置文件连接模式 |
| ip_limit | 是否限制ip访问,true或false或忽略 |
| flow_store_interval | 服务端流量数据持久化间隔,单位分钟,忽略表示不持久化 |
| log_level | 日志输出级别 |
| auth_crypt_key | 获取服务端authKey时的aes加密密钥,16位 |
| p2p_ip | 服务端Ip,使用p2p模式必填 |
| p2p_port | p2p模式开启的udp端口 |
| pprof_ip | debug pprof 服务端ip |
| pprof_port | debug pprof 端口 |
| disconnect_timeout | 客户端连接超时,单位 5s,默认值 60,即 300s = 5mins |

客户端连接
点击仪表盘里面的客户端,按图片所示新增一个客户端。
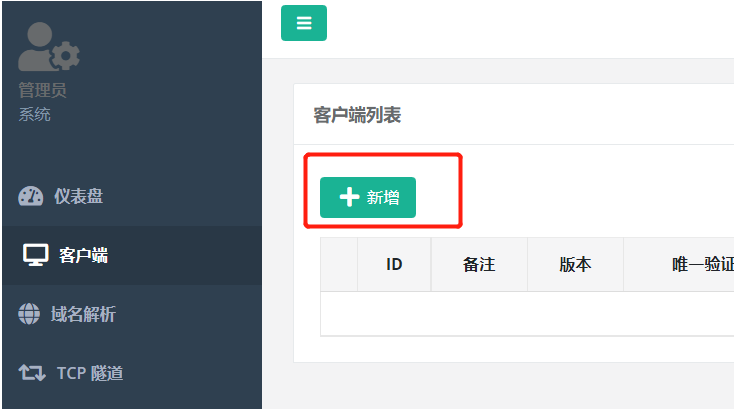
填写备注,下面的压缩和加密选择“是”。

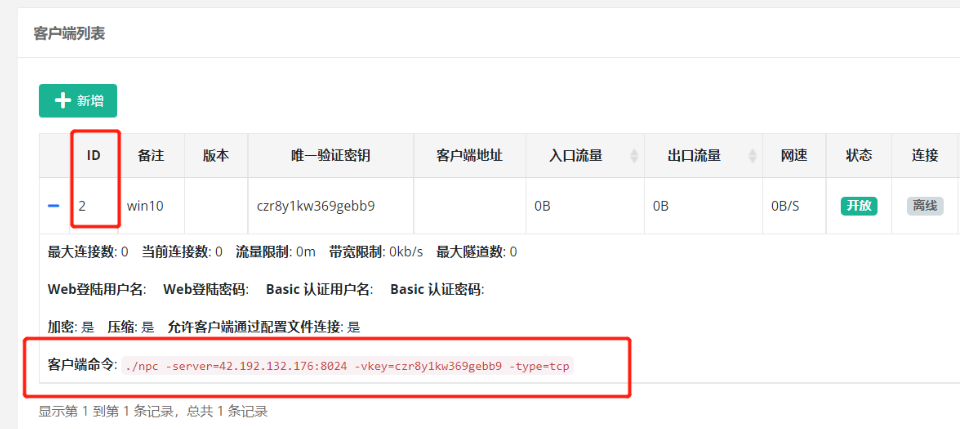
添加好后就会得到一个客户端ID为2。

点击左边的加号,会出现下面的一条客户端命令,这个命令是在windows系统下面执行的,执行的时候不需要前面的"./"。
在保存了nps客户端的文件里按住shift键点击鼠标右键,打开Powershell
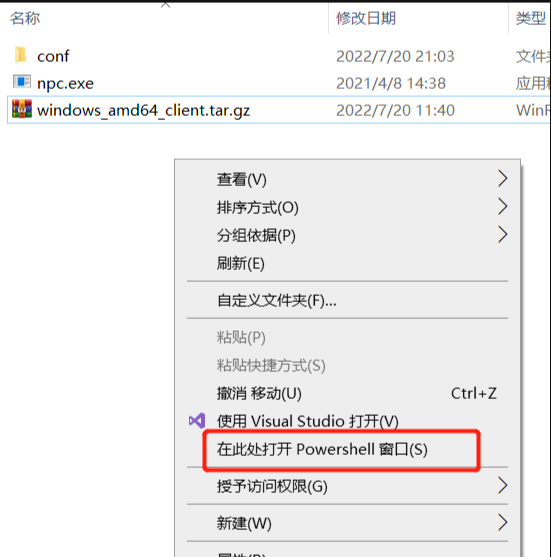
输入命令cmd,和从网页上获取到的命令,出现Successful就可以了。
此步骤可以修改conf里面的配置,直接将vkey写入配置文件,点击nfc运行即可。

可以看到网页上的状态显示在线

创建TCP隧道
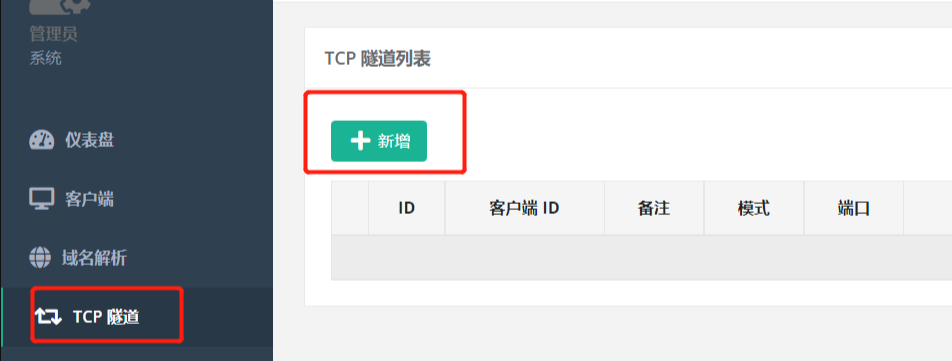
客户端ID写之前创建客户端得到的ID,服务端端口写一个没有用过的端口就行,当然防火墙里面也要放行这个端口。目标端口写需要访问的端口。
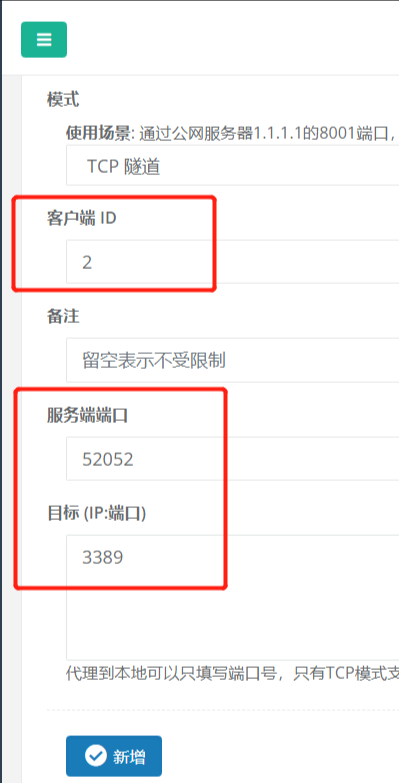
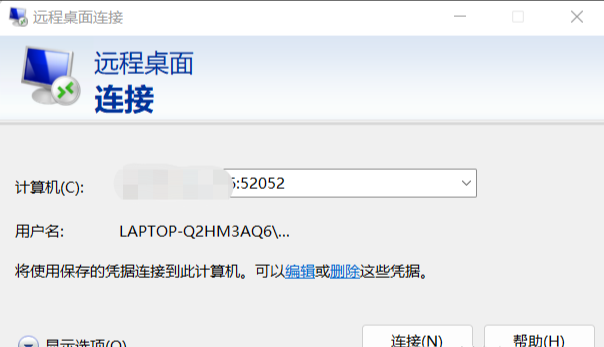
这样所有访问服务端端口的流量就会被转发到客户端端口,也就成功连接上了处于内网的主机。
目标(IP:端口):127.0.0.1.3389(windows远程端口为3389,这个不能改)
总结
使用nps这样一款小工具实现了内网穿透的效果,可以实现出门在外用轻薄本连接家里游戏主机快乐玩耍的需求,当然其他TCP和UDP的连接也都是可行的,看个人的具体需求,也不会占用云服务太多的资源,非常值得推荐。
如何解决无法启动nps的问题
How to resolve the issue?
Step 1:
run nps, it will show the log

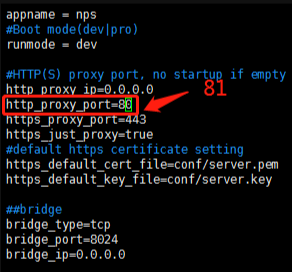
we can see the 80 port have been used by other program, so we need to change the port.
Step 2:
chang the 80 port to 81 port, if the 81 port, you have been used, you can change to other port.
vi /ect/nps/conf/nps.conf
Step 3:
nps restart
ps -ef|grep nps
netstat -anp|grep “:81”

Step 4:
check the “IP:8080” in browser.
If you use the aliyun, you need to open the 8080 port and 81 port in aliyun security policy(安全策略).
Also if the 8080 port has been used , you also need change the 8080 port to other port.